Surprise everyone with these sneaky and delectable brownies. Fudgy and rich red velvet brownies are bursting in the center with a layer of gooey cream cheese frosting.
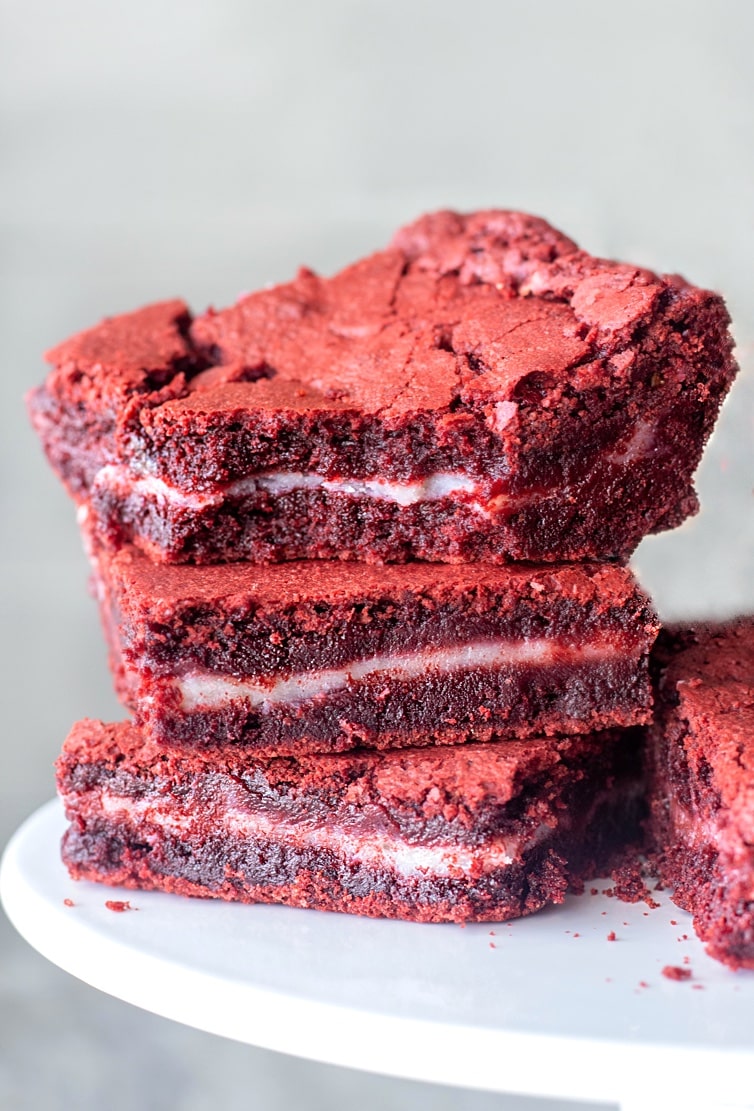
The best part of these brownies is the gooey layer of cream cheese frosting in the middle. They're easier to eat than frosted brownies and have a richer flavor and more fudgy texture than swirled brownies.
So here are all my tips and tricks to get the perfect cream cheese layer in the middle of your brownies.

Make the Frosting First
STEP 1: LINE THE PAN- Don't skip this or you can just throw out your frosting! A quick layer of plastic wrap enables this whole process to be pretty painless. It doesn't have t be pretty, just fully covered.
STEP 2: MAKE THE FROSTING- The frosting is only 4 ingredients: cream cheese, softened butter, confectioner's sugar and a splash of vanilla extract. Simple whip these together with a whisk or electric mixer and the frosting is done.
STEP 3: FREEZE SOLID- Here's the part that makes all the difference. If you don't freeze the frosting, you'll never be able to spread the top layer over it. Spread the frosting evenly across the entire pan.
Find the coldest part of your freezer and stash the pan there for at least 2 hours. The frosting layer should be almost frozen solid ( a little tacky is okay), otherwise the plastic wrap will not peel off when the time comes.
PRO TIP #1: USE A WET SPOON TO SPREAD THE FROSTING If you're having a hard time spreading the cream cheese across the bottom of the pan, try wetting the back of a metal or plastic spoon and then spreading it out. If the frosting starts to stick again, just dip it or run it under some water again and continue spreading.
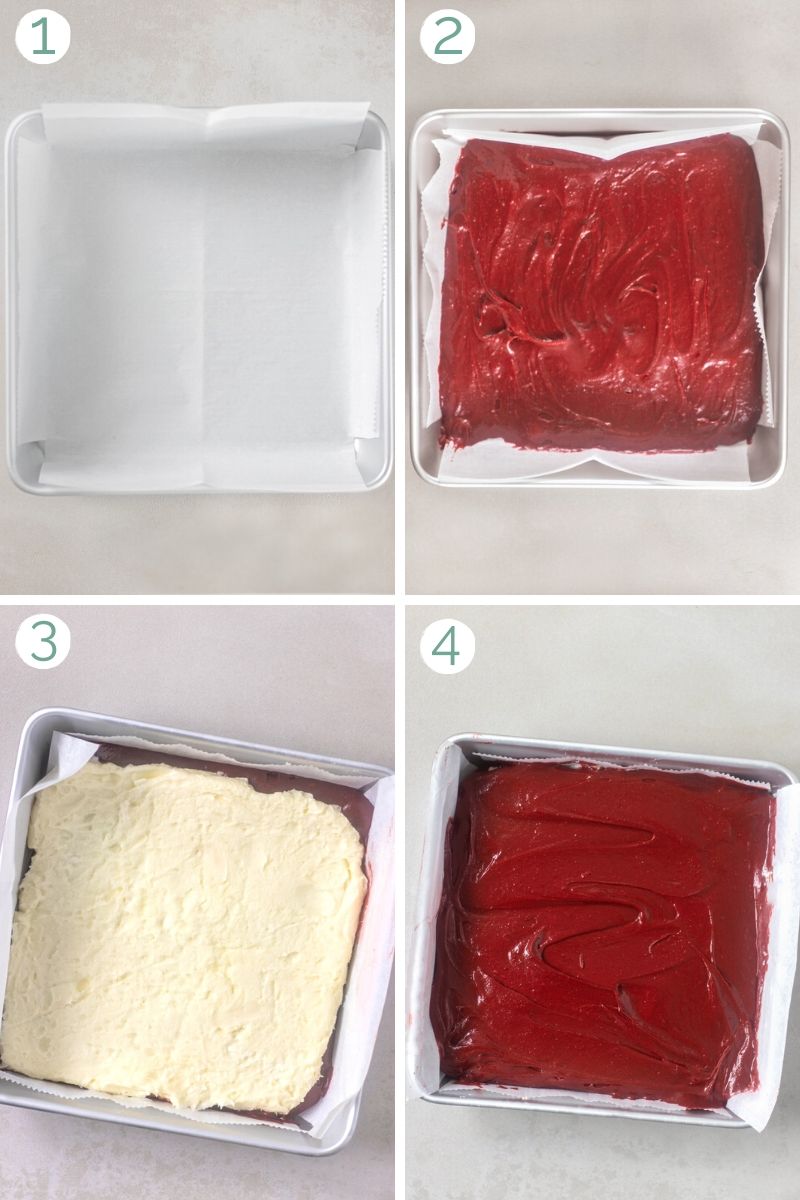
Layering Instructions
This batter is simple to make because you don't even have to separate wet and dry ingredients. Simply stir them into one bowl, one at a time. Then you get to the fun part - layering the brownies for baking.
STEP 1: LINE THE PAN- If you don't have parchment, you can butter and flour the pan, however I have found parchment to be the easiest when it comes to getting the brownies out and cleaning the pan later.
STEP 2: SPREAD THE FIRST BATTER LAYER- Using a scoop or large spoon, put half the brownie batter in the baking dish lined with parchment.
This layer will be very similar to spreading the frosting. The batter is thick, so use a wet spoon if you need, just make sure the layer is spread out evenly.
STEP: 3. TOP WITH FROZEN FROSTING LAYER- If your frosting is totally frozen, this layer should be a cinch. If it still moves, you're going to run into problems, so don't rush the freezing process.

Grab the plastic wrap on the sides to pull out the frozen frosting. Pull back the sides of the plastic to make sure it's not covering any of the top of the cream cheese, then flip the frosting layer upside-down on top of the spread brownie layer.
Once the cream cheese layer is in, you should have the plastic wrap on top. Starting in the corner, peel back the plastic slowly until it's completely off, then throw it out.
STEP 4: SPREAD FINAL BROWNIE LAYER - We're in the home stretch! Just scoop the rest of the brownie batter out into the center of the cream cheese and spread it from the center out to the edges.
PRO TIP #2: TAP OUT THE AIR BUBBLES The layers can create air bubbles in the brownies. Tap the bottom of the pan a few times on the counter to get everything filled in.
Storage
- STORAGE: These brownies do well stored in room temperature for up to 5 days before they start to get stale. If you want to keep them around longer than that, then I would wrap them in plastic and put them in the fridge.
- WARMING:These brownies with their melty, gooey center really are the yummiest when warmed, but they can also be enjoyed at room temp. I like to put mine on a microwave-safe plate and warm an individual brownie for just 10 seconds on high and it's perfect.

FAQ's
When switching from an airy cake batter to a dense, fudgy brownie batter, it's all about changing the ratio of flour too fat. This recipe only calls for ¾ of a cup of flour and I added the melted chocolate chips to get that fudgy center for the brownies.
If you happen to prefer a more cakey brownie - feel free to add an additional ¼ cup of flour. I haven't toyed with this yet, though, so you're flying blind on cook time.
Brownies are a lot like chicken breast - you have to pull them at the right time or you end up with a cracked, dry mess. You don't want to wait until the toothpick comes out clean or they get super cracked on top in the oven.
Take them out when they're still a bit underdone and leave them in that hot pan, they'll keep cooking while they set. So it's double duty. You just have to muster up the patience to not dig into them or it's all over!
Definitely! This recipe is definitely a waiting game and there are shortcuts to be had. If you would rather save time and not wait for the freezing, make the frosting while the brownies set and spread it on after you pull them out.
I only call for a thin layer of frosting center (trust me, I tried a thicker one, it was just overkill). If you're putting it on top, though you may want more. Bump the cream cheese up the whole 8-ounce block, the butter up the ¼ cup and the sugar up to 1 ½ cups for a larger batch.
Another word of caution is that I don't know how cooking these brownies without the center will affect the cook time, so keep an eye on them early - like the 25-minute mark, to make sure they aren't overcooking without that extra layer of moisture in the center.
OTHER DESSERT RECIPES YOU'LL LOVE
📖 Recipe

Red Velvet Brownies
Ingredients
BROWNIE LAYER
- ½ cup butter (1 stick, cut into 1" pieces)
- ½ cup semi sweet chocolate chips
- 1 cup sugar
- 3 tablespoons unsweetened cocoa powder
- 2 eggs (lightly beaten)
- 2 teaspoons pure vanilla extract
- 2 teaspoons red food coloring
- ¾ cup all purpose flour
- ½ teaspoon salt
CREAM CHEESE LAYER
- 5 ounces cream cheese
- 3 tablespoons butter (room temperature)
- ½ teaspoon pure vanilla extract
- 1 cup powdered sugar
Instructions
CREAM CHEESE FILLING
- MAKE THE FROSTING: In a medium, microwave-safe bowl, warm the cream cheese for 30 seconds on high. Stir the cream cheese, if it does not stir, warm for an additional 15-20 seconds until fully softened. Add the remaining ingredients and whisk or beat with an electric mixer
- FREEZE THE FROSTING LAYER: Line an 8x8 baking pan with plastic wrap. Scoop the frosting into the plastic-lined pan and spread evenly across the bottom.1 Make sure the frosting is even in height and runs from corner to corner, edge to edge. Place the pan in the coldest part of the freezer and let it harden for 2-3 hours.2
BROWNIE BATTER
- PREPARE: Preheat the oven to 350˚ F and line an 8x8 baking pan with parchment paper.
- MELT THE BUTTER AND CHOCOLATE: In a medium, microwave-safe bowl, add the butter and chocolate chips. Microwave on high for 30 seconds and whisk the butter and chocolate together. If the chocolate has not completely melted, microwave an additional 10-20 seconds.
- MIX IN REMAINING INGREDIENTS: Combine the remaining brownie layer ingredients (sugar, cocoa powder, eggs, vanilla, food coloring, flour, and salt) one at a time, stirring the batter after you add each ingredient. The batter should be thick.
- LAYER THE BROWNIES: In the prepared baking pan, spread half the brownie batter over the bottom. Once the brownie batter is evenly spread, pull the frosting out of the pan using the edges of the plastic wrap. With the plastic still attached, place the top of the frosting layer on top of the prepared brownie layer (plastic wrap side should now be on top). Peel back the plastic wrap off the frosting and discard. Top the cream cheese layer with the remaining brownie batter and spread evenly.
- BAKE AND COOL: Bake the brownies in the prepared oven for 35-40 minutes. They will still seem soft but will continue to cook while cooking. Allow the brownies to cool for 20-30 minutes. Use the parchment to pull out the brownies and cut into 9 squares. These are best served warm but are still great cooled.
Notes
- To spread the frosting more easily without it moving the plastic wrap around, use the back of a spoon that has been dipped in water. If the frosting sticks, dip the spoon in water again.
- When the frosting is ready to go into the brownies it should be almost completely hard otherwise the plastic wrap will not come off.
Nutrition
RECIPE EQUIPMENT
**This blog post contains affiliate links to products that I actually use and that align with my values. See my affiliate disclaimer here.




Leave a Reply